Sorry to break it to you.. but waders leak, hard to believe. Right?
If you spend any time using your waders you’ve likely hooked yourself a few times, maybe you stabbed yourself with fish’s dorsal spine or bushwhacked your way thru some brambles trying to get that thin blue line. But when you feel the drip, drip, drip, there’s no doubt you now have leaky waders. So you googled “How to fix leaky waders” and ended up here.
Below is a quick guide to find and fix that leak.
No garden hoses, air compressors, or soapy spray bottles needed.
While this is not the only method to repair leaky waders, it’s one I used. This process works best with access to a dark room, basement, garage, or walk-in closet in my case.
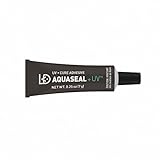
You will want to do identify all the holes you can before attempting any repairs. Once you apply the Aquaseal it takes 8-12 hours to cure on a flat surface, and you don’t want to keep searching for holes with wet Aquaseal applied.
While not necessary or possible with boot wader, turning the wader inside out does help. You will be applying the seal to the inside of your waders.
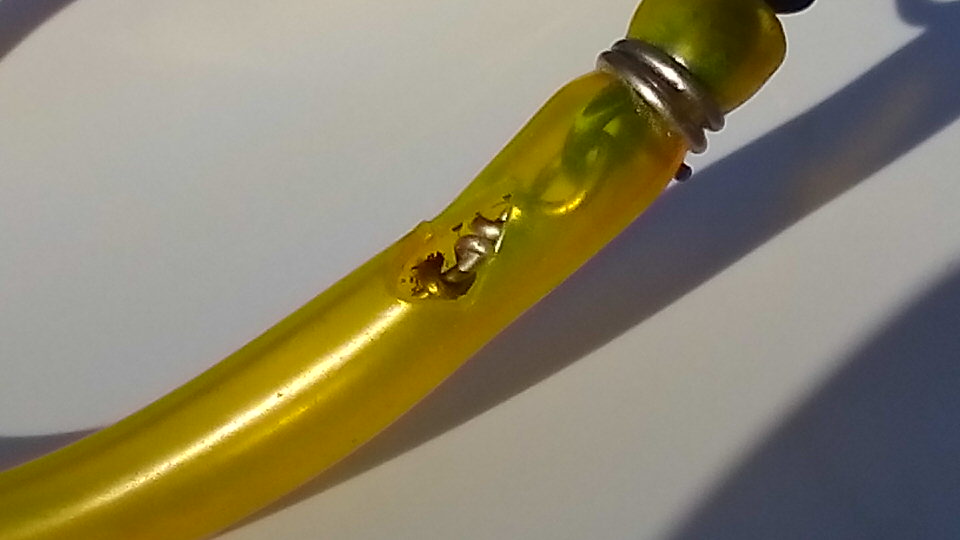
Identify the damage
Turn on your flashlight run the flashlight along the inside.
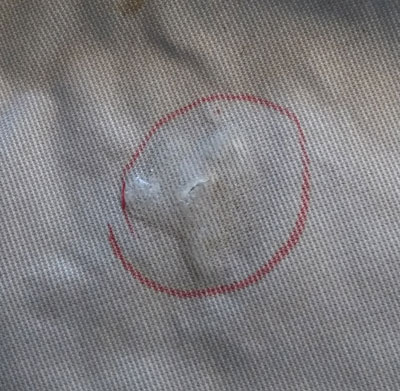
First, check the seams. Sitting, stretching, kneeling, all of would likely put stress on the seams. Keep an eye out for the bright spot.. gotcha! Mark it with a circle and move on.
Pinhole opening at the stitched seam of Waders belt loop.Small Tear in Wader
The hunt continues… working one leg at a time keep searching for those little bright spots.
Small Pin hole in Wader, much easier to see in a dark room
After you completed marking all the little holes you found it’s time for some Aquaseal.
Leave the confines of your hiding spot, and find a flat surface where you can lay your waders out and not be move during the duration of the curing time of the Aquaseal.
Let’s play Bingo, work your way thru the circles, apply a little dot of Aquaseal right from the tube where needed and walk away, let it cure.
Marked Wader RepairMarked Wader Seam and Repair
Once you have got the pinhole and seam repaired and allowed the AqeaSeal to cure, inspect where different materials overlap and change.
Neoprene to wader, Boot to neoprene etc.
Wader Boot Seam repair
A visible hole may not be present with the overlap of thicker material. Look for any yellowing old glue or areas that just don’t look right. Apply a fresh layer of sealant at the edges with the tiny brush that came with the kit and work it into the seams, again let it sit and cure.
After your all done, be sure to clean the threads of tube real good before putting the cap back on, you want to be able to reopen the tube later. Don’t be stingy use the AquaSeal, this may be the last time you open that tube without a scissor.
Hopefully, this was $10 – $15 well spent and you can enjoy a few more trips without springing a leak.
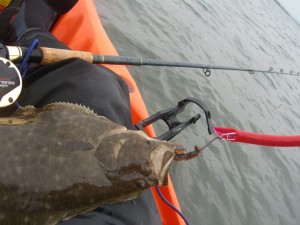
For those that don’t already know, the Tube and Worm is the most effective Kayak Fishing lures for Striped Bass in the NorthEast. Trolling is a highly effective method for Kayak Fishing and the Tube and Worm is specifically designed for trolling.
Basically, you can’t catch a fish unless your line is in the water and more water you cover paddling the better.
And how do you do that? Trolling
What do Big Striped Bass love to eat? Eels
How do you attract fish? Live Bait, Tip the hook with a sand worm.
And what lure can do all that??? You gotta know by now…
“TUBE AND WORM”
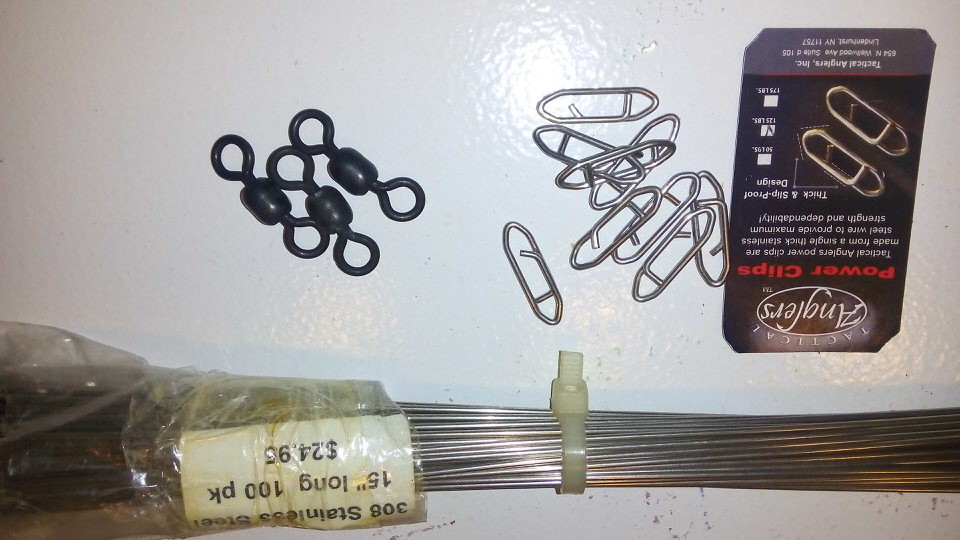
Not all Tube and Worm lures are equal, and here are the must-have features.
Being able to replace the hooks. Would you buy a car you could change the tires on?
Through-wire that will hold a shape. This is where the Tube and Worm gets its action, by putting a half spiral bend into the Tube body it spirals in the water. From any perspective, this looks like the wave-like swimming profile of and eel or sea worm
Blue Fish Ready. Striped Bass aren’t the only fish in the Sea. I’ve even caught fluke on a Tube and Worm. A toothy yellow-eyed Blue Fish is going to go right for the body, you will feel the bump but will miss the tail hook. The Tube need to be thick and chewy.
So if you want it done right, you might as well DIY.
So lets build some Tube and Worm lures.
Tube and Worm Material List
Tubing – 1/2″ OD or 3/8 ID is perfect. You should be able to find your basic black tubing at any home improvement center. But a Quick Amazon Search under UV Tubing will get you some cool UV colors.
Rig up your wire 14 ” – 16 “. Swivel at one end, Tactical Angler Clip on the Other. 2 Vise Grips works well here.
Cut You Tubing to length
Lace Wire in Tube
Wrap the Head in the pinch of the barrel swivel. A Hog Ring would work great here. I just use the Lure Wire.
Cut a little breather Hole at the top, so the tube will flood and sink.
Clip on a Hook.
Tube and Worm DIY HardwareTube and Worm Head WrapTube and Worm Tail WrapTube and Worm TubingTube and Worm DIY
How to Fish the Tube and Worm.
This Kayak fishing lure is going to get some action. I like to fish mine with Monofilament line, trolling is no place for braided fishing line. When the fish hits your going to need the line stretch or your going to get a lot of break-offs. Ball Bearing Swivels, Trolling Rudder or Weighted Keel is a must. The Tube and Worm is designed to spin. Unless you use Ball Bearing Swivels and a keel, you are going get line twist. Using a Weight keel is also nice, you can change the weights out to get down low. I’m working on DIY keel weight now and will link to this article once its completed.
Low and Slow, that is where you want to be.
Once you feel it start tapping the bottom, give the fishing reel a crank to bring the lure just off the bottom, and you should be right in the zone. Good Luck with your custom Tube and Worm
If this is all too much to handle, you can always buy one.
A milkcrate is the Swiss Army Knife of onboard kayakfishing gear and tackle storage. The tradition originates with the longboard fishermen, precursors of the SOT-yakkers, who bungeed milkcrates to their surfboards and deep-water fished with handlines (and you thought you were crazy!). Many kayakfishing purists have a “thing” about not drilling any unnecessary extra holes in their boats, and a properly-rigged milkcrate can help get around this.
Will they fit your kayak? Real (commercial-grade) milkcrates come in two basic shapes/sizes: the square or four-gallon crate (nominal OD 13W x 13L x 11H and nominal ID 12W x 12L x 10H), and the rectangular or six-gallon crate (nominal OD 13W x 18-1/2 x 11H and nominal ID 12W x 18L x 10H). But bear in mind that many kayaks have a tankwell with slightly sloped sides, so make sure you’re looking at the dimensions of the bottom of your tankwell. The depth of your tankwell may place serious restrictions on where you
can externally mount accessories to your crate, too.
Your crate (or bucket system, or cooler hybrid, if you so prefer) is you, partner. You can hack it and tweak it and customize it to death. You can have different crates for different types of trips (freshwater or saltwater sportfishing, crabbing, shrimping, scalloping, frogging, etc.), and just slap on what you need and go. As you become more experienced at kayakfishing, you may find yourself becoming a true minimalist — but for now, go ahead and get it out of your system. Spend many maniacally happy hours tinkering with that PVC milkcrate-mounted radar antenna, that crankbait-launching mortar, that bimini top, that tuna tower, that hand-cranked daggerboard windlass…..Who knows? You might even invent a totally new and really useful kayakfishing accessory.
Milkcrate Ethics
Those milkcrates cost somebody some serious money. The real problem isn’t people like us, it’s the professional rustlers who steal large quantities and the recyclers who turn a blind eye. Visit your local grocery and/or convenience stores and ask. Many places will cheerfully part with one or two. (Also, you should be advised that milkcrates as we know them may not be around much longer — major retailers are now experimenting with cheaper alternative systems, so you hardcore craters may want to start tucking a few extras away.)
If you have to (or feel obliged to) pay for milkcrates, you can order commercial-grade crates — and special liners and dividers — in different sizes and colors. A Google search will turn up a cornucopia of information. And don’t forget our rigging forums!
Many traditionalists, however, insist that liberating a poor milkcrate, otherwise condemned to a life of alternately being rained upon and shivering in some heartless dairy cooler, and leading that unfortunate container to a life of gliding over sparkling water in the company of true sportsmen, is an act of heroic rescue not unlike pulling a helpless child from a burning building. Only you can decide.
Working With Plastics
Like woods and metals, different plastics are suitable for different applications. Most commercial milkcrates are high-density polyethylene (HDPE). Complete properties charts for most plastic materials are readily available on the internet, so there’s no excuse for not knowing exactly how your materials will perform in a given environment. You don’t really need power tools to do complex work with most plastic materials. As an old-time trim carpenter, I can tell you that your best longterm investment for this stuff would be a good-quality coping saw (a wide variety of blades are available) and a small hand drill or brace with a good variety of bits (including paddle bits and a cheap holesaw set). The difference with hand tools is a lot like the difference between a kayak and a stinkboat. Quiet, low-cost, low-maintenance, minimal fuss, as green as it gets, and infinitely more satisfying at some primal level. A few plastic spring clamps, a decent work surface at a comfortable height and a selection of sandpaper grits should give you everything you’ll need for basic work. Safetywise, obviously, breathing any dust or vapor is highly likely to be not good for you, so take simple, common sense precautions. If you’re working outside or in, say, an open carport, get the wind at your back when you cut or sand. Indoors, you should probably wear a paper filter mask.
Nylon Bolts, Nuts and Washers
When you see most rigging projects involving crates, buckets, coolers, etc., you’re most likely to see any attachments made with either stainless steel hardware or the ubiquitous zip-tie. Why use any more metal (stainless or otherwise) in your crate than is absolutely necessary? Modern hardware stores can provide you with super-tough connecting hardware made entirely from nylon — lightweight, super-strong, non-corrosive and non-conductive. The superior tensile strength of stainless steel really isn’t relevant in most crate/bucket/cooler applications, since any force able to shear a short, properly-fitted nylon bolt is most likely going to tear your crate right out of the boat anyway (and probably trebuchet you all the way to Cancun). “Plastic fasteners” may be made from a variety of materials. Nylon 6/6 — widely available and fairly cheap — is almost always your best bet for most kayak-crate applications, being inert to fungus or mold; resistant to petroleum products and alkalis, etc.; and self-extinguishing to UL 94V2. ALWAYS use Nylon 6/6. Do NOT use acetal copolymer, polycarbonate, PPS, polypropylene, HDPE, LLDPE or any of the other materials that plastic fasteners are sometimes available in. You can save a lot of money down the road by simply bulk-buying one all-purpose longer-length/size of bolt, and trim them to length (a coping saw works great, or you can snip them off with a nipper) inside the crate after snugging them down. To minimize the possibility of items stored in the crate snagging on the nut, just “round them off” with a dab of hot-melt glue and a (very) wet finger. With the availability of nylon parts ranging through standard/specialty screws, bolts and rivets, retaining/finishing washers, spacers, bushings, nuts/wingnuts/acorns, clips, hose/cable clamps & ties, vent plugs… well, the odds are good that you can find ANY weird parts you might need. Additional Tips: Always use washers. The weak link in bolting together any two thin and/or fairly weak materials is in the materials, not the fasteners. Washers increase the area that pushing/pulling forces are being exerted upon. If your application requires spacers, simply get a small piece of stiff nylon tubing with an ID closest to your bolt’s diameter, and snip off whatever length spacer/collar you need. Available in virtually any hardware store. Nylon fasteners are your best bet for attaching accessories (rodholders, whatever) through the sides of hardshell coolers, too. If you use metallic bolts (e.g., stainless), you have essentially equipped your cooler with “heat pipes”, which will significantly increase your loss of cold. Use nylon hardware, gloop the bolt with some slow epoxy, shove it through and washer-and-nut it before the epoxy sets up (and wipe off any excess). Do not use nylon fasteners for through-the-hull connections (padeyes, handles and so on).
Oversized Plastic “Washers” and/or Backing Plates
Sometimes you need to really rigidly secure (e.g., bolt) something to an area of the crate that is either all “diamonds” or solid but non-reinforced, and a cable-tie setup simply won’t do. For round shapes, use a hole-saw bit with your drill (you can get a nested set of umpteen different sizes for two bucks from a junk-Chinese-tools dealer at most flea markets), and go to town on a variety of cheapo plastic items (e.g., dollar-store plastic cutting boards, the flat-thin- plastic sections of spare crates, 5-gallon bucket lids, etc.). A hole-saw bit cuts the disc and the center (pilot) hole in one quick operation. Sets usually have 7 to 9 stepped sizes from around 1″ to 2-1/2″. Thicker plastic melts if you get it too hot, so drill through thicker stuff in small increments or at lower speeds. Square, rectangular, trianglar or really odd shapes can be cut with a jigsaw or coping saw, again from crate or bucket scrap, or one of the potential sources mentioned above.
Lids & Compartments, Shelves and Dividers
Since milkcrates are designed for vertical nesting, you can saw off one crate’s bottom and turn it into a lid for another crate. Cutting off the bottom third just above the reinforcing rib will make an open “lid” a few inches deep, and if you have three crates available, you can make a really nifty combo. Just remember that, in the latter example, you will be able to anchor items like rodholders only to the front and sides of the main (bottom) crate, in order for the lid(s) to open — and vertically-protruding fixtures secured to the back or hinged side (e.g., a light pole) will require a standoff of several inches for the lid(s) to open fully. A broad range of cheap shelf/divider material is available in the dollar stores, from plastic cutting boards (many with built-in handles, handy for clamping or tying things to) to a wide variety of plastic containers(of varying sturdiness). Anything you can take out of the Great Wastestream is a win-win.
Miscellaneous Parts & Connectors
Don’t overlook the possibilities of PVC conduit clamps for securing tubular fixtures (flag and sternlight poles, etc.). They’re cheap, light, strong and readily available in a broad variety of sizes. These provide much better attachment than, say, bolting directly through holes drilled through PVC pipe. And, properly fitted, can even be used to allow things like light poles to slide in and out. Sometimes you need little spacers, standoff blocks, “I-beams” or “L-brackets”, or God knows what else, to properly mount certain additions to your crate. Once again, crate or bucket scrap can come to the rescue, especially the ribbed or reinforced sections. All you need is a saw and a little sandpaper.
Other Milkcrate Storage Options
On many of my crates, I’ve used mil-grade first aid pouches (with the Alice clips removed and replaced with zip-ties). You can secure a “line” of these around the inside of your milk-crate, anchored through the “diamonds”, or fill a few otherwise blank areas on the outside front of a crate for fast and easy access to small but potentially critical items. All of my crates have a pair of these on the outside front wall; between the two, they contain a highly-compact but pretty comprehensive med kit, including one field dressing, one tampon (very effective for deep and broad puncture wounds), a tourniquet, a suture set, and a small selection of disinfectants and critical short-term meds. Other pouch-mountable items might include a small but high-quality monocular or pair of mini-binoculars; that factory belt-pouch that comes with many headlamps; small tubes of bug juice and sunscreen; a disposable space blanket and/or poncho, or… well, you get the drift. Just remember that you can literally wind up “going overboard” with this stuff. Think “vertical center of gravity” and “weight penalty”. If you use a fish billy (I’m 100% catch-and-release, but I habitually tote a red oak tireknocker), you can secure it to clips or sheath it in a bottom-capped vertical PVC tube on the outside (or inside) of your crate. (But make sure to include a small drainage hole for any tubed storage.)
Milkcrate Flotation
Although potentially a real space-killer, sections of pool noodles can be zip-tied to the inside or outside of crates. Bear in mind that 1 foot of standard noodle provides about 2-1/2 pounds of flotation. You might also want to do a little research into denser closed-cell foams; some are available in flat sheet form, and might be used to line crate bottoms or sides with a little less space penalty.
The Crate-to-Kayak Connection
Yes, you want your crate tied securely to your kayak. No, you do not want it tied so securely that it won’t break away under a fairly massive amount of stress. Something — anything, hell, I don’t know, a tree limb, a suicidal billfish, anything — that can snag your crate, can potentially flip your kayak or even drag it under. The generic term for such an object is a “deadman”. Can you guess why? There are umpteen billion possibilities involving bungee cords (or cordage and “cam caps”) that will work just fine. Yes, your gear is precious to you. So is your kayak, but you don’t strap yourself to it with a seatbelt… er, do you???
Yeah, But Can You Get To It??
OK, you’ve finally managed to design The Ultimate Milkcrate — on paper, anyway. It wasn’t easy. Those constant visits from the police about the maniacal laughter emerging from your workshop, the neighbors sadly shaking their heads as you tested that chum-catapult prototype on the front lawn, the endless paperwork securing that permit for your stakeout pole shoulder holster, those suspicious looks from the staff at the plumbing supply store as you asked them if they carried any 11-1/2 degree 5-way elbows… but now it’s showtime, right? Wrong. Before you start assembling all the parts, invest in a bag of reusable zip ties. Hang the fixtures where you think they should go. Sit down on the floor, place your milk-crate the appropriate distance behind you, and practice! Unsecure and open the lid, extract a particular item, close and secure the lid. Repeat, stowing the item away. Learn to do it with either hand. From either side. Without moving the milk-crate. In the dark. Good. Now you can start doing permanent attachments. And when you get done, go test the whole rig in your kayak, on the water.
Awesome new kayak for fishing? Check. Sweet fish finder? Check. Figured out the correct battery type and size to power the new rig? It’s not as straight-forward as it should be — picking a battery requires a small amount of basic electrical knowledge. But no sweat. It’s actually pretty simple. Here goes:
Basic Electronics
To choose a battery, we need to start with the absolute basic electronic concepts. Electrical power comes in two forms. Direct current (DC) is power generated by a battery, always flowing in the same direction (positive -> negative). This is the type of current needed by most fish finders, so we’ll be focusing purely on that. However, for completeness’ sake: alternating current (AC) is what powers your home, generated by a power plant. The current alternates directions 50-60 times a second and, without getting into too much detail, is easier to transmit over long distances.
When discussing electronics, there are four units to understand: voltage (volts), current (amperes), resistance (ohms), and power (watts). The easiest way to grasp these is to think of them in terms of plumbing. Voltage is like the water pressure, pushing water into the pipes. Current is similar to the rate of flow within the pipes (gallons per min., etc.). Resistance is like the size of the pipe itself.
Power (watts) is a little harder to grasp. Think of it like water, coming out of a pipe, hitting a water wheel and causing it to spin. If you want the wheel to spin faster, you have two options. 1.) Increase the pressure coming out of the hose, hitting the wheel harder. Or, 2.) increase the quantity of water coming out of the house, spinning the wheel faster purely due to the extra water weight. Similarly, power is the product of the voltage and current (power = current X voltage).
Head spinning yet? To sum it all up, voltage = force, current = rate, resistance = transmitter size, and power = capability of the voltage and current.
There’s one final item to consider: battery capacity. When discussing smaller contexts, such as fish finders, this is usually expressed in “amp/hours” (Ah). Think of this as the cistern providing water to the hose. If the water is flowing at a specific rate, how many hours would the supply last? Similarly, if electrical current is being consumed, how long will the battery be able to supply power? We need a big enough “bucket”.
Fish Finder Power
Most fish finders need DC battery power. Typically, they require 12 volts (again, the amount of “pressure” exerted by the battery). But, technically, many fish finders can safely use as low as 10 volts and as high as 20. However, since 12 volt batteries are the most common, I’d recommend just sticking to them.
Most fish finder specifications will list the “current drain” in the manual or on the box. For instance, my Lowrance ELITE-4X HDI lists a current drain of “Typical: .75A”.
In other words, “typically” it’ll pull .75 amps of current per hour. Two things to note here: 1.) Some companies will list this in milli-amps (mA). 1000mA = 1A. So in this example, it might be 750mA. 2.) Lowrance is listing the “typical” (average) pull, as opposed to the “peak”. Traditionally, most companies will use the latter. For instance, the greatest amount of consumption on the Lowrance might be closer to .8-1.0A. If you have the average available, great. If not, it’s best to assume the “peak” when calculating your needs. Worst case scenario, you’ll end up with a few extra hours of fishing time… Ok, enough jibber jabber. What exactly does that mean? Well, it all comes down to how long you want the fish finder to last per outing. Keep in mind that higher battery capacity always translates to more physical weight. Personally, I try to trim down as much as possible when I’m out, even if the battery weight seems relatively minimal — every bit helps. So for my purposes, assume 8 hours is enough. That means I would need a 6 amp/hour (Ah) battery (.75A X 8hr = 6Ah).
Battery Types
Essentially, you have three choices here:
Lead acid: No different than you car battery — acid, sealed-in. They’re inexpensive and easily recharged, but they’re also the heavier option.
Rechargeables (lithium, NiMH, etc.): Much lighter than lead acid, but also much more expensive. They can also be more complicated to recharge, frequently requiring a special adapter.
Alkaline (AAA, AA, A, etc.): Technically, you can use multiple battery cells at once in order to get the power your fish finder needs. However, I’d recommend skipping these. For example, most alkaline cells only produce 1.5V, so you’d need 8 of them to get the required 12V. Also, your amp/hours will take a huge hit — those 8 AAs will only give you about 2Ah. Further, these can’t be recharged and end up in the trash.
I almost always go with the lead acid. Even though it’s heavier, its small cost and ease-of-use trump the alternatives.
Specific Batteries
Many stores (Bass Pro, Cabelas, Gander Mountain) have 12V lead acid batteries specifically marketed for fish finders or other outdoor applications. But, unless you find them on sale, they’re overpriced. I currently use a simple 8Ah unit I found on sale at Frye’s Electronics for $20. But you can find several on Amazon for even less. Don’t get anything fancy — run-of-the-mill units will suit you perfectly.
7-8Ah
Battery Chargers
Keep ‘er simple. A charger, like the following, works perfectly and is usually less than $10: However, I already had a larger battery charger that I use for automotive and marine batteries. If you only need it for the kayak, they’re probably overkill. But, they’re definitely handy to have around for other applications. Here are some options on Amazon. There are also inexpensive options at Menards, Lowes, and Home Depot. Keep in mind that the amp rating on the charger describes how fast it’ll be able to charge your battery. Large values are convenient for quickly charging a car battery, but small values are more than sufficient for the kayak. Some guys/gals will also permanently install a charger unit on their boat/kayak. The small unit gets mounted somewhere out of the way, and the wires are permanently attached to the battery leads (in addition to the fish finder wires). Here’s an example:
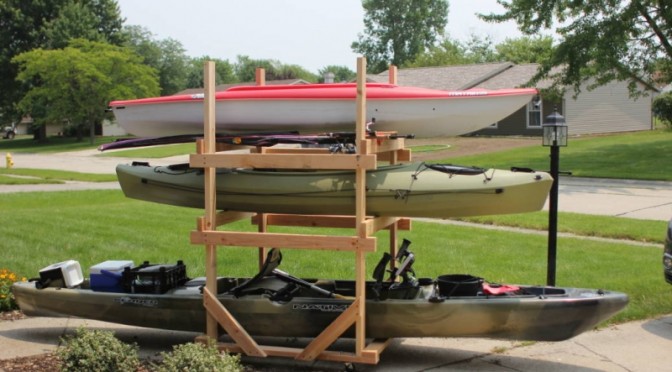
Until we’re able to buy property and build a pole barn (please, God, let that be soon), we’re stuck with a 2 car garage. With all our hobbies combined, space quickly became an issue. And with the necessary layout, wall and ceiling space is extremely limited.
Invalid Displayed Gallery
After getting fed up shuffling the kayaks around on the garage floor, and not wanting them outside, we quickly threw together this rolling storage rack. It’s incredibly simple to make and is cheap — nothing but 2×4 studs, locking caster wheels, screws, and a handful of nuts/bolts/washers.
This setup has the added benefit of having plenty of board space to screw in rod holders, bike hooks, etc. Before you know it, half your garage storage is rolling around on a franken-rack.
Dimensions:
6 ft. tall (the upright posts, not including the caster wheels or board they’re mounted to)
4 ft. long (no need to make it longer)
32 in. inside width
28 in. inside height (bottom)
16 in. inside height (middle)
Obviously, adjust the dimensions as needed. 16″ tall and 32″ wide is plenty for most hulls. The 28″ height on the bottom allows room for the fish finder and rod holders.
Tips:
Do not skip the slanted supports between the posts and base. Without them, the frame flexes quite a bit (since the only thing holding it on, otherwise, are 2 screws going up from the bottom of the base into each post).
I’m just using drywall screws. Good enough? Sure. But decent wood screws or lag bolts would be stronger.
You’ll see that the cross bars holding the kayaks rest on top of the lengthwise bars. This is also important, doubling up the amount of screws holding up the weight. Of course, if I used proper bolts, this would be moot…
The caster wheel positions are pushed a ways into the base, rather than directly underneath the posts. Now that I think about it, I might recommend putting them under the far corners, getting longer bolts, and driving them straight up into the posts. This will put all the weight directly on the wheels, in addition to being far stronger than the 2 screws.
I may replace the wheels. The ones shown are 2 1/4″ casters. They handle the weight fine, but far garage/barn uses, you’ll want something bigger. These small ones tend to catch everything and stop, rather than roll over it. 3″ might be a better minimum. Better yet, spend the extra $ on pneumatic ones.
As is, the rack is not tippy at all (surprisingly), as long as you keep the heavy kayak on the bottom. If you add another level, I’d probably expand the base in both directions, at least somewhat.
Some guys will wrap the support bars with carpet squares or remnants. Fair idea, but I’ve found it to not be all that necessary. Pine is so soft that it doesn’t scratch or rub off anything.
I just left the top bare, but you could easily make a shelf with another level of cross-bars and a sheet of plywood. But, with the garage door rails overhead, there wouldn’t be any room to get much up there.
Alternatives
This looks interesting — and it’s certainly more attractive than pine. It’s a bit pricey, but the reviews are glowing and it appears to be well-engineered. If mobility is important, it doesn’t look like it’d be hard to add casters. Plus, outside, this will last a lot longer than studs…
Of course, there’s no end to other types of kayak storage systems, as long as you have the wall or ceiling space.
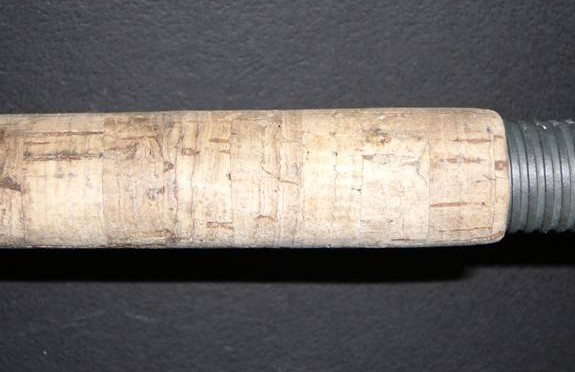
However after a couple months of use you begin to notice all the little craters and holes that magically appear one day in your fishing rod grip. Time to do some cork grip maintenance. Most rod manufacturers use inexpensive cork for the cork handles and usually end up filling the holes and craters with some kind of filler. So what do we do to refurbish the grips?
In need of some Cork Grip Maintenance
Here’s a picture of a grip of an old fishing rod grip. It doesn’t have too many holes and craters on it but you’ll notice it’s very direct.
First thing you need to do is to clean the grip.
Get yourself some Dawn and an old toothbrush. Clean it with warm water and use the toothbrush to get rid of all the fish slime that’s been caked on there. Once you have it clean, let it completely dry.
This would be a good time to take a trip to your local hardware store. At your local hardware store pick up some wood filler and fine sandpaper. I’m using MinWax Wood Fillerand a 220 grit sand paper and a bottle ofTru-Oil Gun Stock Finish. You guys with guns know what I’m talking about. You can also use a cork sealer made by U40, which is available online. If you have access to cork, you can use cork dusk and Elmers glue to create your own filler. Its just easier to buy the MinWax Wood Filler in my opinion.
Cork Grip Maintenance Supplies
Take the fishing rod handle and clean out the pits/hole/craters on the grip by using a bamboo skewer (or something with a point). Once that’s accomplished, start filling in the pits/holes/craters with the MinWax Wood Fillerwith your fingers. Don’t fill it flush because the filler does shrink a little when it dries. Put the rod aside and let the filler dry. Usually an hour or so.
Once the filler is dry, take your sand paper and sand the handle. Start with the 220 grit sand paper or so grit and if you want it smoother use a higher grit paper. After sanding, wipe the grip down with a moist paper towel and let it dry.
The last step in the process is to apply theTru-Oil. Tru-Oilwill help seal the cork handle and actually extend the life of the cork. Next time you buy a new rod, apply the Tru-Oil (or Cork Sealer) before you even begin using the rod. Apply the Tru-Oil with a paper towel or an old cloth. Two coats will be all you need.


 will get you some cool UV colors.
 the big one’s 175lb <- I can’t live without these things.

 or
or