Choosing a kayak paddle
Paddle selection is a critical decision, just as choosing the right fishing kayak, your needs are important. Performance, comfort, durability and safety are good measures to go by. Most of the equipment you select should be evaluated by these four measures to ensure you get exactly what you are looking for. The paddle is no exception.
- Performance
- Comfort
- Durability
- Safety
A paddle needs to be matched to both the kayak and the paddler.
Paddles come in various blade shapes and shaft lengths usually 210 through 250 cm. Say you have decided on a kayak that is 14 feet in length and 26-inch beam (width). You are 6 feet tall and your knuckles do not drag on the ground. A 220 or 240 should be just right.
Kayak width and your height are main 2 factors for Paddle Length.
The blades of the paddle should enter the water without you hitting your knuckles on the kayak or you reaching for clearance. Does it feel comfortable?
Paddle Blade design
Most paddles on the market have blades that are of asymmetrical plane form or shape. A narrower blade is generally used for long-distance or touring. They put less strain on your shoulders and back on the long haul. A wider blade is useful for more powerful paddling or shorter kayaks. Every Kayak will track and glide differently based on a lot of factors, hull design, rudder vs. no rudder, cargo etc. Tracking – Is how straight the kayak will travel without a correction, Glide is how fast the kayak feels.. A general rule a longer kayaks track and glide better. What type of performance are looking for?
Paddle construction & durability
Most blades are made of a strong, lightweight plastic. Some are wood, fiberglass, or fiber glass-carbon lay up. The plastic is more forgiving should you strike an oyster bed and are less prone to cracks or breakage.
Paddle shafts are made of aluminum, fiberglass, graphite carbon or wood. Aluminum is generally the more durable of the lot but can make for a heavier. Fiberglass and graphite are lighter and plenty strong but may crack over time. I have seen this happen with some Kayakers that I have known but have not had it happen to me yet. I think it is more due to neglect than a material flaw.
Paddle Technique
When you paddle, you place the blade into the water near your foot and with a slight twist of the torso pull the paddle back behind you while pushing with your other hand against the paddle shaft. The other blade comes over on the other side and is placed at your other foot where you begin the next stroke. When placing the blade in front of you at your foot to begin the stroke. You should not have to lean forward or into the stroke. If you are finding that you have to do this or the paddle or shaft strikes the kayak a lot, then a longer paddle may be the ticket.
A whole day of paddling with the wrong paddle will make the going not as good as it should be. So a general rule of thumb– a narrow kayak- shorter paddle, wider kayak- longer paddle but fine-tune it to your body make up (long torso, arms, legs etc) If you have never paddled before then have a professional instructor show you the ropes Go for a long paddle with the kayak and the paddle to make sure that it performs comfortably for you.
The knowledgeable staff at any good paddle shop will listen to what you need and set you up with the kayak and paddle. Just like a kayak you should test/demo a paddle as well. Once you get all this together, speed, maneuverability, comfort, and endurance will be all you can expect from you paddling experience.
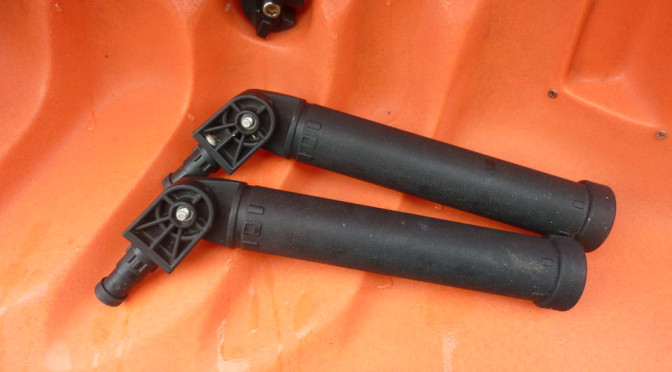
Two-Piece Paddles
If you purchase a two-piece paddle be sure that after every trip you take it apart and rinse with fresh water otherwise you will soon have a one piece. Do this even if you paddle fresh water. Do not add grease or any other type of lube as they will attract sand and dirt, just the thing to ruin it in short order.
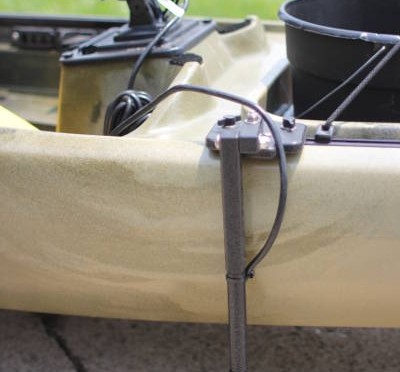
Leash it or Lose it
Last. Be sure to get (or make) a leash. There is nothing worse than being up the creek without a paddle (literally!!!) A leash can also be purchased from the place you bought your kayak/ paddle. Most of them are either a coiled plastic (like a phone cord) or shock cord affair and work very well. Or you can simply make one from some spare small diameter rope with a hangman’s or barrel knot tied into it to form an adjustable loop to go around and tighten against the paddle shaft. Works very well for me. (Cheap too!)
List of Paddle Manufactures
- AINSWORTH http://www.ainsworthpaddles.co.uk/
- AQUABOUND PADDLES https://aquabound.com/
- AT-PADDLES http://www.atpaddles.com/us/
- BENDING BRANCHES https://bendingbranches.com/
- BLACKLIGHTPADDLES http://www.carlislepaddles.com/
- CARLISLE PADDLES http://carlislepaddles.com
- CAVINESS WOODWORKING http://www.cavinesspaddles.com/
- EAST POLE PADDLES http://www.eastpolepaddles.com/
- GREY OWL PADDLES http://greyowlpaddles.com/
- RED PADDLE http://redpaddleco.com
- SUPR PADDLES http://upr-paddles.com
- SWIFT PADDLES http://eddyline.com/paddles/
- WERNER PADDLES http://www.wernerpaddles.com/
- WINDPADDLE SAILS http://www.windpaddle.com/
OCEANBROAD Kayak Paddle 90.5in/230cm Alloy Shaft Kayaking Boating Canoeing Oar with Paddle Leash 1 Paddle, Black
$32.95 (as of July 26, 2024 18:18 GMT -04:00 - More infoProduct prices and availability are accurate as of the date/time indicated and are subject to change. Any price and availability information displayed on [relevant Amazon Site(s), as applicable] at the time of purchase will apply to the purchase of this product.)
Karltion Kayak Paddle - Adjustable 2 Pieces Aluminum Alloy Shaft with Glass Fiber Blade for Surfing,Oar Fishing Easy Packable Travel- Mint Green
$32.95 (as of July 26, 2024 18:19 GMT -04:00 - More infoProduct prices and availability are accurate as of the date/time indicated and are subject to change. Any price and availability information displayed on [relevant Amazon Site(s), as applicable] at the time of purchase will apply to the purchase of this product.)
WONITAGO Kayak Paddles with Alloy Shaft and PP Blade, Floating Kayaking Oars, Adjustable 230-250 cm/90-98 Inches, Black
$30.99 (as of July 26, 2024 16:39 GMT -04:00 - More infoProduct prices and availability are accurate as of the date/time indicated and are subject to change. Any price and availability information displayed on [relevant Amazon Site(s), as applicable] at the time of purchase will apply to the purchase of this product.)
Pelican Takedown Kayak Paddle - Aluminum Shaft - Recreational Paddle - Black - 86in.
(as of July 26, 2024 18:19 GMT -04:00 - More infoProduct prices and availability are accurate as of the date/time indicated and are subject to change. Any price and availability information displayed on [relevant Amazon Site(s), as applicable] at the time of purchase will apply to the purchase of this product.)
Pelican - Standard Kayak Paddle - Orange - 220 cm (86.6 in.) - Aluminum Shaft and a Durable Polypropylene Blade - 0/65° Blade Angle - with Drip Ring - PS1967-00
$36.99 (as of July 26, 2024 18:18 GMT -04:00 - More infoProduct prices and availability are accurate as of the date/time indicated and are subject to change. Any price and availability information displayed on [relevant Amazon Site(s), as applicable] at the time of purchase will apply to the purchase of this product.)
SeaSense XTreme 1 Kayak Paddle, Black, 96” - Molded Plastic Blades, 2-Piece Aluminum Construction - Great for Recreational, Sport, Sea, Whitewater & Fishing Kayaking
$24.89 (as of July 26, 2024 16:39 GMT -04:00 - More infoProduct prices and availability are accurate as of the date/time indicated and are subject to change. Any price and availability information displayed on [relevant Amazon Site(s), as applicable] at the time of purchase will apply to the purchase of this product.)
Pelican Poseidon Paddle 89 in - Aluminum Shaft with Reinforced Fiberglass Blades - Lightweight, Adjustable Kayaks Paddles - Perfect for Kayaking Boating & Kayak Fishing (Blue, 2020 Model)
$45.00 (as of July 26, 2024 16:17 GMT -04:00 - More infoProduct prices and availability are accurate as of the date/time indicated and are subject to change. Any price and availability information displayed on [relevant Amazon Site(s), as applicable] at the time of purchase will apply to the purchase of this product.)


 and the list goes on….