
Until we’re able to buy property and build a pole barn (please, God, let that be soon), we’re stuck with a 2 car garage. With all our hobbies combined, space quickly became an issue. And with the necessary layout, wall and ceiling space is extremely limited.
Invalid Displayed Gallery
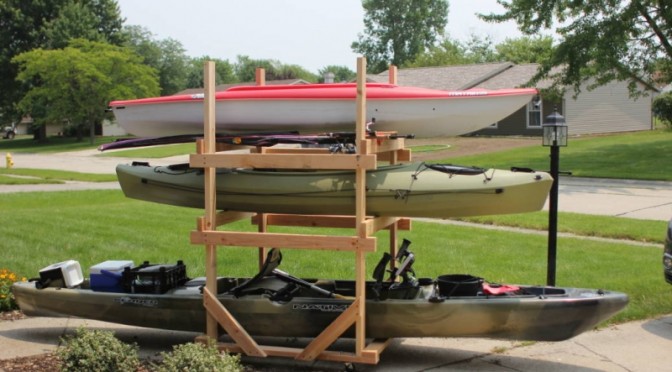
After getting fed up shuffling the kayaks around on the garage floor, and not wanting them outside, we quickly threw together this rolling storage rack. It’s incredibly simple to make and is cheap — nothing but 2×4 studs, locking caster wheels, screws, and a handful of nuts/bolts/washers.
This setup has the added benefit of having plenty of board space to screw in rod holders, bike hooks, etc. Before you know it, half your garage storage is rolling around on a franken-rack.
Dimensions:
- 6 ft. tall (the upright posts, not including the caster wheels or board they’re mounted to)
- 4 ft. long (no need to make it longer)
- 32 in. inside width
- 28 in. inside height (bottom)
- 16 in. inside height (middle)
Obviously, adjust the dimensions as needed. 16″ tall and 32″ wide is plenty for most hulls. The 28″ height on the bottom allows room for the fish finder and rod holders.
Tips:
- Do not skip the slanted supports between the posts and base. Without them, the frame flexes quite a bit (since the only thing holding it on, otherwise, are 2 screws going up from the bottom of the base into each post).
- I’m just using drywall screws. Good enough? Sure. But decent wood screws or lag bolts would be stronger.
- You’ll see that the cross bars holding the kayaks rest on top of the lengthwise bars. This is also important, doubling up the amount of screws holding up the weight. Of course, if I used proper bolts, this would be moot…
- The caster wheel positions are pushed a ways into the base, rather than directly underneath the posts. Now that I think about it, I might recommend putting them under the far corners, getting longer bolts, and driving them straight up into the posts. This will put all the weight directly on the wheels, in addition to being far stronger than the 2 screws.
- I may replace the wheels. The ones shown are 2 1/4″ casters. They handle the weight fine, but far garage/barn uses, you’ll want something bigger. These small ones tend to catch everything and stop, rather than roll over it. 3″ might be a better minimum. Better yet, spend the extra $ on pneumatic ones.
- As is, the rack is not tippy at all (surprisingly), as long as you keep the heavy kayak on the bottom. If you add another level, I’d probably expand the base in both directions, at least somewhat.
- Some guys will wrap the support bars with carpet squares or remnants. Fair idea, but I’ve found it to not be all that necessary. Pine is so soft that it doesn’t scratch or rub off anything.
- I just left the top bare, but you could easily make a shelf with another level of cross-bars and a sheet of plywood. But, with the garage door rails overhead, there wouldn’t be any room to get much up there.
Alternatives
This looks interesting — and it’s certainly more attractive than pine. It’s a bit pricey, but the reviews are glowing and it appears to be well-engineered. If mobility is important, it doesn’t look like it’d be hard to add casters. Plus, outside, this will last a lot longer than studs…
Of course, there’s no end to other types of kayak storage systems, as long as you have the wall or ceiling space.


Great DIY idea here. If you’re going to invest in outdoor sporting equipment like a kayak, it’s definitely worth investing in an effective storage solution that’ll keep it protected when it’s not in use.