Lure Choice: The Differences are the Same

Lure Choice: The Differences are the Same

By: Bill “Heywood” Howard

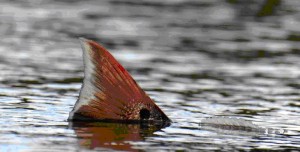
A while ago I came upon a hook and jig manufacture based out of Jacksonville called Slayer Inc.  I took a look at their website and liked what I saw, weedless jerk bait hooks.  As a big user of soft plastics like Mister Twister Exudes and D.O.A.’s, I’m always on the lookout for these types of hooks.  I was really impressed with their service and order response time.  But that’s not what I’m writing about this week, on their website they had several different types of in-line spinner baits.  After talking with the owner about these lures, I decided to do a informal survey of different kayak fishing sites around the gulf coast.  When I talked with Chris at Slayer I told him that those types of lures were not very popular here in the Tampa Bay  area and he agreed.  We both felt that our fish here are way to spooky for these lures.  So, I thought I would ask different fisherman what their “Go To” redfish lure would be.  I expected to see some big differences based on location, but man was I surprised.

Starting with the Texas Kayak Fisherman, I was really surprised at some of the selections as well as some of the comments.   The top choice by far was some type of spoon, either gold or silver.  Tied for second was either some type of Gulp or a Heddon Spook Jr in non other than Bone color.  The choice of top water was very interesting.   I never consider a top water lure when targeting redfish, more often I will use it as a locater or search lure, using it to locate them and then use some sort of plastic to catch them.  Another lure that seems popular is flats minnow made by the Texas Tackle Factory.  A search of their website uncovered some very interesting choices and color combinations.  Check them out.  One of the comments made by more than one forum member was that they don’t really target redfish.  “Don’t target redfish?”  “Why the heck not?” I asked.  Well, it seems they have really big trout in Texas, kind of like our snook, so that’s the preferred species.

Moving over to Louisiana, gold spoons or inline spinner baits were the dominate lure of choice.  Other than that, I didn’t get much information from those boys.  They must be to busy out catching all those big redfish I see on TV.  Shoot, they swim right up to the boat sometimes.  Must be nice to not have the fishing pressure we do here.  I know one thing about the area, they do not practice Catch and Release.  They are meat fisherman.  Their bag limits are outrageous.

Moving over to Florida, I concentrated my research to the Tampa Bay area.  I do know up in places like Jacksonville that those in-line spinners are very popular.  The water clarity up there is not like what we have here, its very stained and tannic,  so those lures work really well.  A poll on Paddle-Fishing.com revealed choices very similar to the Texas fisherman.  An over whelming favorite was some sort of spoon, in gold or silver.  I cant find a fault with this choice one bit.  A Johnson Gold Spoon is one of the first lures I learned to use.  Pretty fool proof once you learn the correct way to retrieve it.  A spoon should wobble, not spin when you retrieve it.  Once you get the hang of it, it’s a great lure for redfish.  Tied for second were Gulps Mister Twister Exudes or some type of jig and soft plastic.  Not as many top waters as the Texas folks.

One thing I did find very interesting was the number of lures I had never heard of before. Cotton Cordell Jointed lure, Manns Baby Minus 1, Wahoo Redfish Key were just some of the lures mentioned by anglers as their favorites.  No old school lures though.  Growing up fishing with my dad, we had a long time Tampa Bay fisherman show us one of his tricks one day.  He pulled out a bag of twin tail bass worms.  Pinching off the front half and rigging it on a red jig head, we proceeded to slay the redfish.  Casting into the sand holes this lure was deadly and still is to this day.  Heck, I know a guy that has used yellow shoe laces to catch redfish.

So what can you take away from this survey?  I don’t know.  The outcome of my research was way different than what I was expecting.  I guess it comes down to this, redfish are pretty much the same all over, they will hit just about anything.  Use what you have confidence in, that’s most important.  If you have confidence in a lure you will use it longer and by doing that, you increase your chances of hooking that redfish your looking for.

Kayak Fishing for Tailing Redfish

Kayak Fishing for Tailing Redfish

By: Bill “Heywood” Howard

Redfish Tailing
Tailing Redfish

What is it about a redfish wagging its tail out of the water that will bring a fisherman to crouch down, lower his voice to a whisper and cause his hands to shake and his heart to skip a beat?  Just the mere thought of tailing redfish keeps me up at night, it’s like an addiction and I can’t get enough of it.  Growing up here in Tampa Bay I never gave it that much of a thought, it wasn’t until I was older and more experienced that I felt the need to chase these tempting fish around on the flats.  My first attempt at catching these elusive fish was a trip to Pine Island sound.  Expectations were high as we made a 2 mile paddle to a protected flat that held promise.  Well it wasn’t long before we were rewarded for our hard work, as the tide dropped we started seeing tails just lazily flop back and forth amongst the grass.  I did manage to catch one that day and since then it has been a continuing learning process.

I always thought that redfish really didn’t tail that much here in Tampa Bay.  Maybe it was due to the fishing pressure or the different types of grass, but man was I wrong.  I have caught them throughout Tampa Bay and it seems to me they tail a little differently in each part of the bay that I have caught them.  Up in the Northern part of the bay you can find them out on the mud flats in the colder months.  Here the tailing action is more aggressive.  The redfish seem as if they are driving themselves down into the mud to catch small crabs or worms.  Down South, they tail more leisurely in the sparse grass left over in the winter months and the lush grass flats of the summer.  Catching them can be a whole different story.

Being a primarily artificial lure user, I like to use a variety of lures depending on the conditions.  In winter time, yes redfish will tail in winter, I like to use a 1/16 or 1/8oz jig with some type of paddle tail body, I like to use a color that matches what the redfish might be eating in that particular location.  What of my old favorites is a lure we used to use when I was a kid, if you can find a bass worm that has a split tail on the end, pinch off all but the last few inches and rig that on a red headed jig.  This was a deadly lure on redfish.  In heavier grass I like to go weedless.   Using a heavy 2/0 through 4/0 wide gap worm hook rig up your favorite jerk bait.  To get some extra distance on your cast’s trying pinching a small split shot on the hook.  There are many weighted weedless hooks on the market now that also work great when combined with some of the scented baits that are available.  I like to use the lightest leader that I can get away with, usually 20 pound fluorocarbon.  Most of the time you will encounter these redfish out on the flats, so a heavy leader is not always required.  Check and re-check your leader and knots before heading out, you don’t want to lose the fish of a lifetime due to a knot failing or leader breaking.

Well, now that you are rigged up, the next step is to find them.  So where and when do you find these redfish.  Over the years I have developed log books so I pretty much know when and where I can expect to see them.  Look to the areas that you usually catch your redfish, nice plush grass flats or dark muddy bottoms.  I like the bottom half of the outgoing and the first part of the incoming tide.  The lower the tides the better.  As the tide drops, the reds have to come out of the backcountry spots and will feed along the flats until the water gets too low.  Once the tide turns and starts coming back in, start looking for them.  Time of day does not seem to matter that much as I have seen them tail during mid-day in the middle of the summer.  When it’s time to eat, they eat, but I do think early morning and late evenings are the best times, especially if the wind is not blowing.  If the wind picks up too much they don’t seem to tail as much.  Another thing I do when looking for tailing reds is to keep the sun behind me if possible.  It makes seeing them a lot easier, you might just only catch a reflection of their tail from a distance, but that could be the difference between going home empty handed or not.

The biggest hurdle to overcome when fishing for tailing redfish is stealth.  You have to be very quite.

These fish are already spooky and when they get into shallow water their senses go into over drive.  Just the slightest noise can send them to the far side of the flats in a heart beat.  I think the most productive method for getting close is to wade.  Just be very careful when doing this, the flats are loaded with hidden obstacles such as string rays and cat fish.  Sometimes it’s like walking in a mine field.  On a recent trip this past July I stepped on two sting rays, luckily for me I didn’t get stuck.  So, you’ve spotted some tailers, what do you do next?  Well after getting close enough to cast, which can be difficult in its own right, you have to determine which way they are heading.  Get your cast out in front of the direction of travel and wait until they are almost right on top of it.  Remember, these fish are feeding, so if something takes off in front of them they will almost always strike out of reaction.  If you are using some of the new scented baits, you can cast it out in front of the fish and let them find it.  Don’t cast to close as this well most assuredly spook them.

On that same trip this past July, I fished the same flat four days in a row.  In those four days I must have seen over a hundred redfish, each one more exciting than the previous.  With a little homework and patience you too can join the ranks of those who are addicted to tailing redfish.


Check out the Forum for more Redfish activity

PFTS #1 – Dynamic Duo

We had 47 anglers show compete in the event held on the south shore of Tampa Bay.

There were a total of 7 slams caught today ranging from 37″ to 73″ *.


Slam Division

1st Place – JoseC with a 59.25″ slam. He won $235.00
2nd Place – Native1-with a 55″ slam. He won $141.00
3rd Place – ChrisR-with a 51.25″ slam. He won $94.00

Trout

1st Place – Cooknfish. 22.2″
2nd Place – Kspops- 22″
3rd Place – Bseggs-21.25″

Redfish

1st Place-13-31″
2nd Place-Skinnywater-27.25″
3rd Place-Norm-26.5″

Snook

1st Place-Kneedeep-30″
2nd Place-Dawgfish-23.75″
3rd Place-PBR-22″

Please visit the forum for more information, participant comments and pictures from the event.

*Not all slams counted due to not following picture taking rules

Fishing Rod Cork Grip Maintenance

By: Phinla Sinphay

Cork grips are wonderful on a new fishing rod.

However after a couple months of use you begin to notice all the little craters and holes that magically appear one day in your fishing rod grip. Time to do some cork grip maintenance.  Most rod manufacturers use inexpensive cork for the cork handles and usually end up filling the holes and craters with some kind of filler.  So what do we do to refurbish the grips?

Cork Grip Maintenance
In need of some Cork Grip Maintenance

Here’s a picture of a grip of an old fishing rod grip.  It doesn’t have too many holes and craters on it but you’ll notice it’s very direct.

First thing you need to do is to clean the grip.

Get yourself some Dawn and an old toothbrush.  Clean it with warm water and use the toothbrush to get rid of all the fish slime that’s been caked on there.  Once you have it clean, let it completely dry.

This would be a good time to take a trip to your local hardware store.  At your local hardware store pick up some wood filler and fine sandpaper.  I’m using MinWax Wood Filler and a 220 grit sand paper and a bottle of Tru-Oil Gun Stock Finish.  You guys with guns know what I’m talking about.  You can also use a cork sealer made by U40, which is available online.  If you have access to cork, you can use cork dusk and Elmers glue to create your own filler.  Its just easier to buy the MinWax Wood Filler in my opinion.

Cork Handle Maintenance Supplies
Cork Grip Maintenance Supplies

Take the fishing rod handle and clean out the pits/hole/craters on the grip by using a bamboo skewer (or something with a point).  Once that’s accomplished, start filling in the pits/holes/craters with the MinWax Wood Filler with your fingers.  Don’t fill it flush because the filler does shrink a little when it dries.  Put the rod aside and let the filler dry.  Usually an hour or so.

Once the filler is dry, take your sand paper and sand the handle.  Start with the 220 grit sand paper or so grit and if you want it smoother use a higher grit paper.  After sanding, wipe the grip down with a moist paper towel and let it dry.

The last step in the process is to apply the Tru-OilTru-Oil will help seal the cork handle and actually extend the life of the cork.  Next time you buy a new rod, apply the Tru-Oil (or Cork Sealer) before you even begin using the rod.  Apply the Tru-Oil with a paper towel or an old cloth.  Two coats will be all you need.


This is what you get when you’re finished….

Cork Handle Grip Maintenance After pic. 1
Cork Grip Maintenance After

Viola!! New Cork Fishing grip..

Cork Grip Maintenance After Closeup

Camping: What to Take

By: Jay Brewington

Okay…I admit it.  I am lazy.  I think in most cases you could exchange the word lazy for minimalist.  I have less to carry, less to clean up, and less to go wrong.  When others are still setting up their gear, I am in my chair.  When they are packing up, I am heading home.

Is this the right way to camp?  No.  It isn’t the wrong way to camp either.  This article will give you an idea of what the lowest end of the spectrum is like.  As you add more items to this list remember the following points:

  1. It’s your dog, you walk it.  You are responsible for the items you take.
  2. Leave no trace.  Take everything out that you bring in.
  3. Never (and I mean NEVER) sacrifice safety.

The new hi-tech camping gear allows the lazy person (err minimalist) to carry more items and still keep the weight down.  There has also been a drastic improvement in freeze dried meals.  You can actually lower your weight and volume usage if you are willing to throw some money at the situation.  I don’t think this is really necessary for an overnight (or even two night) trip.

So what do you need?  This is what I now take when I go for an overnight trip now:

Stuff you always carry anyway

One if the nice things combining camping with fishing is that many of the things you need for the camping experience are already in your inventory.  With that in mind, I am leaving out a complete discussion of equipment that I think fisherman would already carry.  I’ve compiled a quick listing of these items:

  • FRS Radio
  • Sunscreen
  • Bug Spray
  • Head Lamp
  • Swiss Army Knife
  • Multi-Tool
  • Fishing Pliers
  • GPS/Compass

Equipment

First Aid Kit:  Don’t leave home with out it; whether it’s for a day or a week on the water.  They weigh around a pound.  Hopefully you will never use it.

Tent:  I use a Hennessey Hammock tent.  This tent weighs in at 2 pound 10 ounces.  With no rods or sticks, it stores compactly in the nose of my kayak.  The drawback to this tent is the need for trees.  Ground tents designed for backpacker work well, also.  They weigh just a little more.

Sleeping Gear:  I chose a fleece sleeping bag.  This weighs about 1 pound 8 ounces.  Since I am not camping in extreme conditions, I don’t see the need for a sleeping bag.  This bag is only rated to 50 degrees and works for me down to about 45.  If you are going to be camping in the winter months, you might want to invest in a bag with a better rating.

Camp Chair:  Definitely take one of the collapsing camp chairs.  They are light and sturdy.  Nothing is worse than not having some place sit when you are at the campsite.  The ones with arm rests weigh about 8 pounds.  The biggest drawback to them is they are bulky and can be tricky to pack.

Cooking Equipment:  I use a propane burner system.  There are definitely lighter systems on the market.  I like the convenience and reliability.  The Coleman 1 burner propane stove I use weighs two pounds.  The fuel cell is heavy, but compact.  I was also able to add a two mantle lantern (3.5 pounds) that uses the same fuel.  Total weight of the system is about 8 pounds. I added a small cook set that weighs in at less than pound.

Many die-hard minimalists prefer an alcohol stove.  They are much lighter and virtually trouble free.  You can even make your own. (Article to come later).  The most basic example of this is the Trangia Stove.  You can buy a stove and cookset for under $30.

Soft-side Cooler:  Once again, technology has come to the rescue.  The new coolers function well in the fall, winter, and spring.  8 pounds of ice will keep overnight and into the next day.  The advantage of the soft sided cooler is that it collapses out of the way on the return trip.

Provisions

You gotta eat. A clean shirt might be nice. Provisions include all of those supplies you need to replenish after a trip.  Again, depending upon how much effort you want to put into it, the amount you take can vary greatly.  The length of the stay will also increase the weight in this area.

Water:  You need a gallon for each day out.  Since most of the camping in our area is done in a saltwater environment, water purifiers are out.  I do not know of any products that purify saltwater. For an overnight trip I’ll take one gallon.  If you are lucky, someone with a canoe will be camping with you.  In that case they can carry a 5 gallon jug at the front of their boat and use it for ballast.

Food:  This is where I really pare down.  For a one night trip, I stop at one of the local sandwich shops and get a sub for dinner.  For breakfast, I carry one the many brands of breakfast bars on the market.  A couple of bags of chips for the campfire bull session and you’re good to go.  Instead of ground coffee, I carry instant.  I can get all of my food and beverages into the soft sided cooler.

Oh…one other item.  “She who must have her way” usually provides me with some kind of fresh baked chocolate cookie to share.  Just because we are camping doesn’t mean we have to be uncivilized.

Many of the campers I go out with disagree with me on this point.  They like to prepare more elaborate meals.  I have to admit that the smell of bacon frying in the morning is a wonderful thing.  Fresh caught fish cooked over an open fire tastes great!  If you don’t mind the clean-up, you can add a few items to your larder and still have a trip with minimal weight and effort.

Clothing:  I carry two shirts, a second pair of wading pants for the next day, and a pair of sandals.  This is one place you need to watch the weather.  Rain Jackets (or suits), sweatshirts, or other inclement weather gear might be needed.  Many campers carry them all the time; just in case.  Clothing does not take up much space and or weight.  It is better to have that rain jacket than to be wet.  Clean, dry clothes will increase your comfort level immensely.

My Luxury Items:

What is the stuff that really makes you comfortable?  Is it a favorite pillow?  Maybe you want to take a book to read.  Luxury items are those things you could live without, but they are just nice to have.  Even the minimalist carries luxury items.

Ice:  This is my #1 luxury item.  It is unfortunate too.  It is bulky, doesn’t last, and adds a lot of weight.  But it is soooo nice to have cool drink after a day on the water.  The ice and food go into the soft sided cooler.

Beverages:  Yeah, you can drink water all of the time.  But what fun would that be?  Whether we are talking about alcoholic or non-alcoholic refreshment, it just makes sitting around the campsite more enjoyable.  If you do take adult beverages, please drink responsibly.  One thing I have heard but never tried.  Some canned beers do freeze well.

Bug Lamp:  If you camp in the summer, you need something to provide protection from the mosquitoes and no-see-ums that are in our environment.  Even in the fall and spring, the biters can come out and get you.  The new OFF plastic lamps are lightweight and seem to do a pretty good job of warding off the pests.  I have yet to field test it.  But they work well in the backyard.  I took it on one trip to test it out and it was so windy, I couldn’t find out.

Personal items checklist

Here are some key items to bring along on any trip lasting more than a day:

  • Medications Including prescriptions, pain killers and antihistamines Bring along a plastic storage container to keep them dry
  • Toilet paper
  • Personal hygiene items
  • Toothbrush and paste
  • Mirror
  • Biodegradable soap
  • Comb or brush
  • Contact lens supplies

If you are interested in really low weight, low volume camping; check out this site: http://www.hikinghq.net/

These guys are hardcore ultra-lightweight backpackers.  It is an excellent site full of great information.  Plus, they have an attitude and ethic similar to the paddle anglers around Tampa.

Kayaking, Camping, & Fishing

By: Jay Brewington

Ever since I got my first kayak, I have been discovering new ways for its use to enhance my outdoor experience.  For example, I found out that some people actually paddle without fishing.  You can actually just go out and enjoy the world around you without fishing.  I have tried this strange hobby and it is really fun.  However, the best of my new found pleasures is extending my fishing time by camping.

Now keep in mind the kind of camping I am talking about here is not some grueling 10 day paddle through the Everglades (although that would be a blast). Rather, this for a person who is going to a single destination and spending one or two nights. Many of the concepts discussed here would not be applicable to someone wanting to do an extended trip. This is simply a way to get out and enjoy our marvelous state for just a little bit longer.

You can enjoy the camping experience in of two ways.  The first and easiest way is to experience one of our fabulous state or national parks.  It would be practically impossible in a short article to list all of the parks that are also great paddling/fishing destinations.  This method of camping also allows you to carry a few more of the amenities that make for the “good life.”  On the down side, the park systems will restrict what you can or cannot do.  Many parks do not allow open fires, for example.  What good is camping without a fire?

I prefer more primitive camping.  I want to load up the boat and get away from it all.  Also a primitive camping trip allows for more of a challenge.  The challenges are not all that insurmountable.  I just find that the extra effort makes for a more rewarding experience.  The biggest drawback to this style of camping is finding locations.  Destinations for the primitive camping experience are becoming harder to find.  In addition, there is a growing popularity for this style of camping which creates competition for the limited space.

For me, there aren’t many things better than paddling out in the afternoon to an island for an extended fishing session.  You can set up your campsite, relax for a while, and then do a little late day fishing.  After that you can spend an enjoyable evening at the campsite.  Or, if you prefer, you can even do a little night fishing.  If you camp on one of the barrier islands you can spend the evening working the beaches.  When you get up the next morning, you are already at your fishing destination ready for a morning of angling.

Another advantage of a 1 or 2 day trip, is the relationships you will form with your camping friends.  While camping solo is rewarding and enjoyable in its own right, nothing beats the community that forms at a campsite.  You can learn much about yourself and other people.  Friendships are made and/or reinforced.

I love to watch how different people act and react while camping.  Some are always busy:  fiddling with equipment, cooking, or tending a fire.  Many of us just like to kick back and relax.  There are the readers.  They always bring a book to enjoy.  The possibilities for enjoying the camping experience are unlimited.  They way people enjoy it is a reflection of their personalities.

A camping/fishing trip is not always about the fishing.  This is the nature of the beast.  The weather may turn inclement.  To me this is a bonus.  Even if the fishing is bad, you might still have a great camping trip.  In fact, I usually end up fishing less when camping than I normally do.

Before I had started on this new adventure, I had not camped in over 20 years.  It is amazing how much the equipment has improved in that time.  Gear is lighter, more durable, and easier to use.  As an added bonus, you can get quality products at a reasonable price.  To be sure, you can still spend the big dollars and buy high end items.

One of the advantages of camping in Florida is our weather.  Unless you choose to go camping in January just as a cold front comes through, you will not need gear for extreme weather conditions.  A three season tent will do just fine.  You do not need a zero degree sleeping bag or any other costly equipment.

Kayaks can store an amazing amount of equipment.  Canoes will hold even more.  Either craft will easily store what the paddle camper needs for a one or two night stay “in the wild.”  At this point comes the first question you need to ask yourself.  How much equipment do I need to take?

I tend to take the minimum amount of equipment to maintain my safety and comfort.  At the other end of the range are those campers who carry the maximum amount of equipment.  They load every nook and cranny of their boat with camping equipment, provisions, and luxury items.  I have even seen them tow a second boat just to carry more gear.

Those who carry the minimum amount have less weight to carry around.  They also have less to clean up and carry back.  Those who go the other route have more creature comforts to make their trip enjoyable.  But they have to deal with the weight and maintenance issues involved with more gear.  I suspect that if you start camping, you’ll fall somewhere in between the two extremes.

Wherever you fall in deciding how much gear you wish to carry, you must remember you have a finite amount of space.  With that in mind, when you start building your camping inventory you must ask yourself the following question, “If I take this, will the weight and space used add to my safety or comfort?”

Look at it this way:  Paddle your kayak with absolutely nothing in it.  Now add your fishing gear.  Paddle it now.  You will notice some minor changes in the way the kayak handles.  Not much.  Most of us don’t carry more than 20 pounds or so of fishing gear (and that would include your anchor).  For those of us on the portly side, that’s less than a 10 percent increase.  Now add 40 pounds of camping gear and paddle the boat again. You’ll start seeing a definite change (for the worse) in the handling characteristics of a boat.

Another factor in that might help you decide in what and how much to take is the impact that you will have on the environment.  Remember, what ever you take into the campsite you SHOULD take out.  Most of us are sensitive to these issues.  The prevailing philosophy is “to leave no trace.”  The more you take, the harder it is to follow this rule.

Part II — What Does A Minimalist Take?

Winter Time Fishing

By: John Callaghan

This time of year your knowledge of your fishing area is going to pay off greatly, predators are less likely to be roaming the flat looking for food, instead they will be holding in comfort zones (as I like to call them) and only moving when necessity demands it, or as more comfortable zone becomes available.

Blind casting can be a fruitless task this time of year, as great areas of a flat will be devoid of fish.

For instance, the deeper pot holes on a flat, channel edges, drop offs will likely be where the fish spend their time waiting for the flat to warm up with the winter sun.

Look for “heat sinks” too, exposed oyster bars, mud flats, dark bottom, sea walls, all of these will absorb heat form the sun during the day and radiate that heat into the water around them. It may only be an increase in a degree or two, but that can make all the difference. Also in winter a slower incoming tide may be better than a quick flooding tide, as the water has more time to absorb the heat energy.

A great tip I received from Capt. Ray Markham is to look for the dying sea grasses.  His theory is as the grass decomposes it generates heat and warms the water around it. It’s easy to identify the dark brown grass, often it will be slowly moving with the current similar to tumbleweed. I took Ray’s advice and have caught some nice redfish sitting down in the rotting grass.

In wintertime the fish are still here they are just a little harder to find, but when you do find them the pay off can be big, as those comfort zones can be crowded with fish.

Another good rule of thumb for this time of year is “Go North young man.” By this I mean work the northerly areas of the place you are fishing, the reasons are two fold. Firstly the Northern shore is exposed to more hours of sun light during the day, so will probably be warmer. Secondly the Shoreline should offer some shelter from the colder North winds so the water will not be cooled as quickly, as well as benefiting from any southerly (warmer) breezes.

Of course this not a 100% fail proof plan but its something to bear in mind as you search for fish.

If you study the area you’re fishing, and try to assimilate all theses factors you should be able to identify a “Comfort Zone”.

Another great tool for this time of year is a good submersible thermometer, drop it over the side as you paddle or fish and check the water temps, finding that spot that’s just a little warmer will help steer you toward the fish, or at least to likely fish holding areas.

Be patient this time of year and slow down, if you find a “heat sink” make a note and be there when the tides starts to flood it, hopefully you should be set up and ready to ambush any fish coming into the area.

When it comes to lures for this time of year, a slight change in tactics is required from the summer time.

I still like to throw a Top water lure this time of year, usually a Top Dog or She Dog, I think the bigger bait is more likely to tempt a predator into expending there energy for a good sized meal.

The retrieve, is nothing like the “walking the dog”, quick twitch twitch finger mullet imitating pattern though.  It takes a little self-restraint but i like to slow it down drastically. After casting, let the lure sit a while, maybe as much as 10 seconds, then just a make a twitch and sit again for a few seconds. Often i will just rattle the rod tip to make the lure shiver, sending out small ripples without moving forward. Then move it again with just a slow twitch maybe one twitch a second at most, for a short distance and let it sit. It’s a hard habit to break of not reeling and twitching at speed, but if you can master the patience needed, it will work.

The slower presentation that is required to tempt a predator into eating in winter is a sure signal to break out the DOA Shrimp. I prefer to use the ½ oz model in winter, going back to the big bait, bigger temptation theory. Water is generally clearer this time of year due to the lack of algae blooms and other factors, so I will stick to a Night Glow pattern or something with some Chartreuse in it. Work it with a slow retrieve with the occasional sharp pull to hop the shrimp off bottom, then wait and let it settle back on the bottom before retrieving again.

The slow speed needed can be hard for people to learn, a tip I always pass onto first timers, is to forget about trying to reel that slowly. Instead just drag the bait along bottom by slowly moving the rod tip about a foot at a time parallel to the water, not upwards which would lift the bait. Then move the rod tip back toward the bait and slowly take in the slack. Many times the hit will come just as you take up all the slack, as the predator sees its lunch begin to move away. Recognizing the take can be a little harder to, as quite often the fish will eat the bait and not move away, so all you will feel is an increase in resistance on the line. Set that hook as soon as you feel it; lessening the time for the fish to eject the bait. If you pull free without setting the hook, then just let the bait be, sit and wait for it to settle again. You may tempt your quarry into taking a second bite.

Jigs are another good bait for this time of year. As the grasses die off there is less to snags or foul your bait. In Wintertime I prefer curly tail baits to the paddle tails. The Curly tail can be retrieved much slower and still have an enticing action. Once again be prepared to let that bait hit bottom and swim it slowly along, with the occasional jerk and pause, but remember to let it fall before continuing to reel. I favor a pearl, green or chartreuse this time of year to match the clearer water conditions.

This time of year fish are moving less and moving slower, and that is how you need to approach your fishing.

This is one of my favorite times to fish, less people on the water and usually fewer areas need to be covered, to locate the fish.

Once you do find a “Comfort Zone’ take note, it may well be used all winter long.

Available for Amazon Prime